Remember the good old days? Hauling your PC to a friend’s house, connecting tangled network cables, and battling pixel-to-pixel in Counter-Strike? Fortunately, LAN parties are still awesome, and the tradition continues with Counter-Strike 2 (CS2). This guide focuses on the essential CS2 LAN server setup process. It’s great for consumer gaming enthusiasts. Moreover, it’s beneficial for all types of esports center owners wanting unique experiences at their retail locations. Ultimately, having on-premise CS2 LAN availability is smart, given the title’s popularity.
Setting up a local game might seem daunting initially; however, it’s quite manageable. Specifically, this guide walks you through using one player’s PC as a dedicated host. Following these steps ensures a smooth CS2 LAN experience after completing the CS2 LAN server setup.
Why Use a Windows Dedicated Server for Your CS2 LAN Setup?
While you can sometimes host simpler games directly from the client, there’s certainly a better way. In fact, running a separate dedicated server instance on the host PC often leads to better performance and stability. This holds true even while that person also plays on it, especially with more players. Essentially, it separates the server logic from the host’s game client rendering, which is a key benefit of this CS2 LAN server setup method.
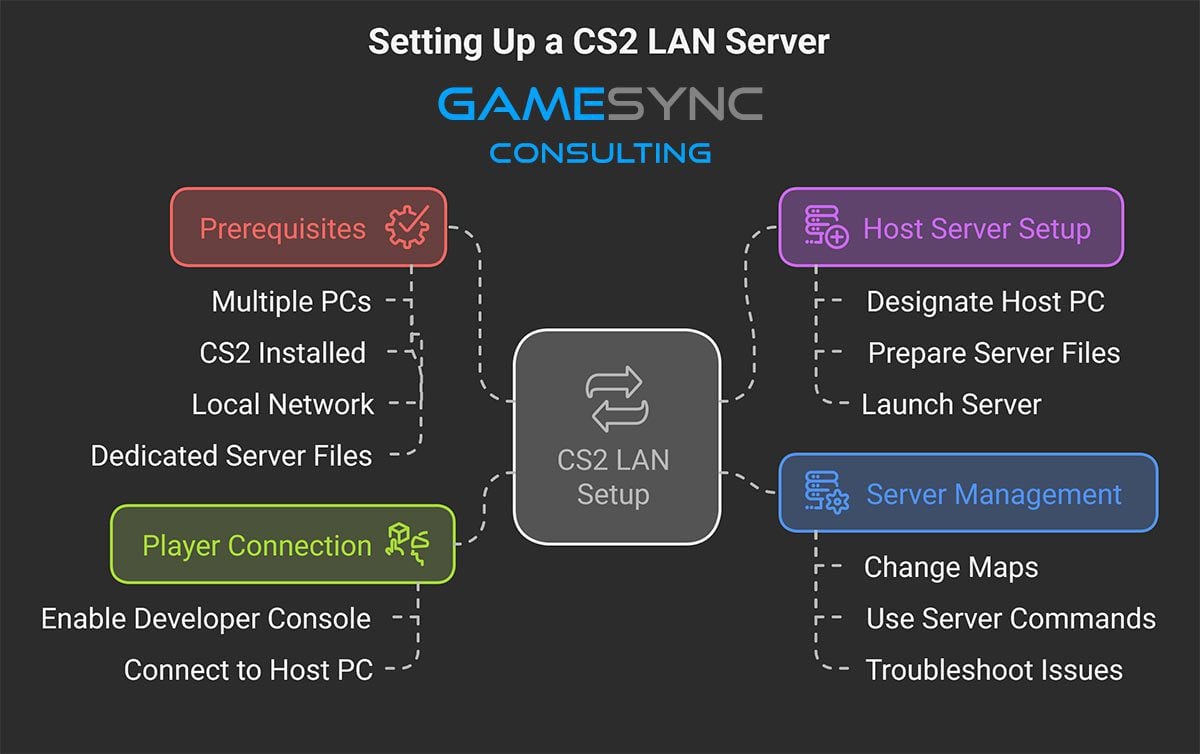
Prerequisites for CS2 LAN Server Setup
- Multiple PCs: Naturally, you need one for each player, including the host.
- CS2 Installed: Every player must have Counter-Strike 2 installed via Steam on their PC.
- A Local Network: Critically, all PCs must connect to the same local network. This usually means the same router, preferably using Ethernet cables for the best experience.
- CS2 Dedicated Server Files (on Host PC): Additionally, the PC acting as the host needs the CS2 Dedicated Server tool installed.
- You can install this via Steam. First, go to your Library. Then, click the dropdown (likely says “Games”) and check the “Tools” box. Now, search for “Counter-Strike 2 Dedicated Server” and install it.
- The installation path might vary. However, it’s often similar to
C:\Program Files (x86)\Steam\steamapps\common\Counter-Strike Global Offensive\game\bin\win64\(Note: CS2 server files often reside within the main game’s directory structure now). Alternatively, it could be a custom path likeD:\Launcher Games\Steam\steamapps\common\CS2 Serverif installed separately. Crucially, know where your server files are!
- Patience & Teamwork: You’ll likely need this, especially if it’s your first time!
Part 1: Host Configuration for CS2 LAN Server Setup
The Host PC will run both the dedicated server software and their own CS2 game client. So, let’s begin the host configuration for your CS2 LAN server setup.
Step 1: Designate the Host PC
First, choose one PC to be the server. Ideally, select a machine with decent specs (CPU, RAM). Remember, it will run both the server and the game client simultaneously.
Step 2: Locate and Prepare the Server Files
- Navigate to where you installed the CS2 Dedicated Server files. For example:
D:\Launcher Games\Steam\steamapps\common\CS2 Server. The typical path might be inside the main CS2 game folder under\game\bin\win64\. - Inside this directory, you should find an executable named
cs2.exe. Importantly, this is different from the one you usually launch to play. Indeed, this specific file is the server executable.
Step 3: Launch the Dedicated Server
This step is crucial for the CS2 LAN server setup. You don’t just double-click cs2.exe. Instead, you must launch it with specific parameters. These parameters tell it to run as a dedicated server and load a map.
Method A: Command Prompt / PowerShell (Recommended)
- Open Command Prompt (cmd) or PowerShell as Administrator. To do this, right-click the Start button and choose “Terminal (Admin)” or “Command Prompt (Admin)”. Generally, running as admin helps prevent potential permission issues.
- Next, navigate to your server directory using the
cdcommand. For example:cd "D:\Launcher Games\Steam\steamapps\common\CS2 Server"(Remember to replace the path with your actual server location. Use quotes if the path contains spaces.)
- Finally, launch the server using the
-dedicatedflag. Also, specify an initial map with+map. For instance, to start with Dust II:.\cs2.exe -dedicated +map de_dust2(If using Command Prompt, you might just type
cs2.exeinstead of.\cs2.exe.)
Method B: Shortcut (Alternative)
- First, right-click on the
cs2.exefile in the server directory. - Then, select “Send to” > “Desktop (create shortcut)”.
- Go to your Desktop, right-click the new shortcut, and choose “Properties”.
- In the “Target” field, navigate to the very end (after
cs2.exe"). Add a space, then type-dedicated +map de_dust2(or your desired map). - The full Target might look something like:
"D:\Path\To\Your\Server\cs2.exe" -dedicated +map de_dust2 - Click “Apply”, then “OK”.
- Lastly, right-click the shortcut and select “Run as administrator” to launch the server.
Step 4: Monitor the Server Console
A console window will appear. Subsequently, it will start scrolling text rapidly as the server loads modules, map data, and game rules.
- Wait for it to stop scrolling. The server is likely ready when it slows down significantly and you see lines indicating game state or waiting for connections. Importantly, keep this window open! Because closing it shuts down the server.
- Firewall Prompt: Also, Windows Firewall might ask for permission for
cs2.exeto communicate. You must Allow access. Ensure both “Private” and “Public” networks are checked if prompted (though primarily “Private” is needed for LAN).
Part 2: Connecting Players to Your CS2 LAN Server
Now that the server is running on the host machine, players (including the host) can connect. This completes the core CS2 LAN server setup loop.
Step 5: Enable Developer Console in CS2 (All Players)
This step is essential for typing connection commands later.
- Launch CS2 normally through Steam.
- Go to the Settings menu (gear icon).
- Navigate to the Game tab.
- Find “Enable Developer Console (`~`)” and set it to “Yes”.
- You can now open the console anytime by pressing the tilde key (
~or`, usually belowEsc).
Step 6: Host Player Connects to Their Own Server
- On the Host PC, after launching CS2 normally (separate from the server window), open the developer console (
~). - Type the following command and press Enter:
connect localhostlocalhostalways means “this computer”. Therefore, this tells the host’s game client to connect to the server on the same machine. - The host player should load into the map specified during server launch.
Step 7: Find the Host PC’s Local IP Address
Other players need the Host PC’s Local IP address to connect. Here’s how the host can find it:
Method A: ipconfig (Standard)
- On the Host PC, open Command Prompt (cmd) or PowerShell (search for
cmdin Start). - Type
ipconfigand press Enter. - Look for the active network adapter (usually “Ethernet adapter Ethernet” or “Wireless LAN adapter Wi-Fi”).
- Find the line “IPv4 Address”. It likely starts with
192.168.x.x,10.x.x.x, or172.16.x.x-172.31.x.x. This is the Local IP address (e.g.,192.168.1.105). - Share this IP address with the other players.
Method B: Cafe Management Software (If Applicable)
- As noted, if you’re using esports gaming center venue management software like CCBoot and iCafeCloud, it often displays the client PC’s IP address in its main interface. Thus, this can simplify finding the host’s IP.
Step 8: Client Players Connect to the Host Server
- On each Client PC, launch CS2 normally and ensure the developer console is enabled (Step 5).
- Open the developer console (
~). - Type the command below, replacing
with the actual Local IP from Step 7, then press Enter:connectExample:
connect 192.168.1.105 - The client players should now load into the game hosted on the Host PC.
Success! Everyone should now be connected to the same local CS2 server, thanks to your successful CS2 LAN server setup.

Part 3: Managing Your CS2 LAN Game Server
The server console window running on the Host PC acts as your control center.
Step 9: Changing Maps
To switch maps, type commands directly into the server console window (the black window, not the in-game console).
- Use the
changelevelcommand followed by the map’s technical name. For example:changelevel de_infernoor perhaps
changelevel de_nuke(Common map names include
de_dust2,de_mirage,cs_office, etc.) - Consequently, all connected players will automatically load the new map.
Step 10: Useful CS2 Server Commands (Optional)
Furthermore, you can use various commands in the server console for management:
status: Shows connected players, their ping, and IDs.kick: Kicks a player.sv_cheats 1: Enables cheats (requires map reload orchangelevel). Conversely,sv_cheats 0disables them. Use responsibly!mp_restartgame 1: Restarts the current round after 1 second.
Troubleshooting Common CS2 LAN Server Setup Issues
- Console Doesn’t Open: First, double-check Settings > Game > Enable Developer Console (
~) is Yes. Also, the key might differ on non-US keyboards (look belowEsc). - Connection Failed / Server Not Found:
- Verify IP: Double-check the Host PC’s IPv4 address (
ipconfig). Then, ensure clients are typing it correctly. - Firewall: The Host PC’s firewall might be blocking connections. Hence, try temporarily disabling the firewall (Windows Defender or third-party) on the host to test. If that works, create specific rules allowing
cs2.exe(server version) for private networks instead of leaving it disabled. - Network: Ensure all PCs are definitely on the same network (connected to the same router). Check cables too.
- Server Running: Crucially, make sure the server console window is still open on the host and hasn’t crashed or closed.
- Verify IP: Double-check the Host PC’s IPv4 address (
- Lag/Poor Performance:
- The Host PC might be overloaded running both server and client. Therefore, lowering game settings on the host PC can help.
- Additionally, ensure wired Ethernet connections are used whenever possible because Wi-Fi can be less stable for demanding LAN gaming.
Conclusion: Finishing Your CS2 LAN Server Setup
Indeed, a proper CS2 LAN server setup takes a few extra steps compared to online matchmaking. However, the reward is a lag-free, customizable, and classic gaming experience with friends beside you. This setup benefits both individual gamers at home and esports center owners. For this reason, we recommend deploying this for an enhanced CS2 experience in any LAN environment. Follow these steps carefully, communicate with your players, and get ready for intense local Counter-Strike action! Enjoy the frags!
Free technical support! Are you having issues setting it up? We’ve successfully deployed these servers at game centers around the country. Contact us and we’ll help you troubleshoot at no cost!


